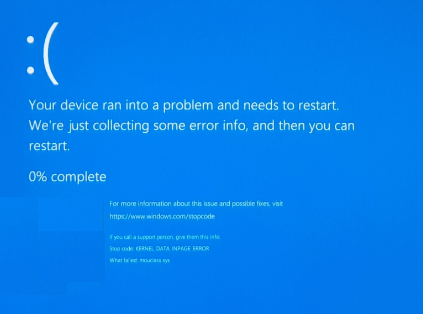
Countless users have claimed after upgrading their PC to Windows 10, when they try to wake up their PC from sleep, they receive Kernel Data Inpage Error followed by BSOD. The full error message reads as:
Your PC ran into a problem and needs to restart. We’re just collecting some error info, and we’ll restart for you.
If you’d like to know more, you can search online later for this error:
KERNEL_DATA_INPAGE_ERROR
The error simply connotes that the Kernel has requested data from the hard drive, but it couldn’t read the data correctly or fast enough. It is directly related to storage drive issues.
When this BSOD error occurs, it halts the users from executing any tasks on their PC. BSOD error is warning sign that your system is in pathetic situation and the error needs to be tackled as soon as possible. Since such errors appear unexpectedly it may lead to data loss as well.
It’s pertinent to mention Kernel can be characterized as a computer’s central processing unit (CPU) and hence it is responsible for managing the whole operating system. As we have earlier mentioned this error signifies trouble with your storage device. But apart from this there could be other factors that manifest the error such as outdated drivers, corrupted/damaged system files, malfunctioning of hardware components, virus or malware infection, and incompatible software installation.
Although the error is critical but thankfully it can be resolved using tried and tested methods. Use the suggested guidelines to get past the trouble.
Methods to Troubleshoot Kernel Data Inpage Error on Windows 10/ 11
Method 1: Use Memory Diagnostic Tool
In the first method, we suggest you to run Memory Diagnostic tool, this utility tool will check your RAM. To do so of follow the below mention guidelines:
Step 1: In the search bar, type in “Memory Diagnostic”

Step 2: Now click on Windows Memory Diagnostics > then click on ‘Restart now and check for problems (recommended).’

Method 2: Uninstall Third-Party Incompatible Software
If you are facing the error after installing third party software, in such case, we suggest you to uninstall the application.
To do so follow the below mention guidelines:
Step 1: Navigate to the Control Panel> Programs >Programs and Features

Step 2: Now check the “Installed On” date and proceed with the uninstalling process
Method 3: Update to the latest Windows Version
You are most likely to face the above mention error if your Windows is incompatible, to proceed follow the below mention guidelines:
Step 1: Click on “Windows key + R keys “to open Run dialog box then type in Control Update and press Enter

Step 2: Click the “Check for Updates” button in the Windows Update window. You will receive notifications such as “You’re Up to Date” if no updates are necessary.

Step 3: Alternatively, download and install if the Windows Update Tool finds a new update. Don’t’ forget to reboot your PC after an update
Method 4: Update your drivers
Obsolete drivers are a major reason to face the above mention error, so in order to resolve the error, update tor drivers to the latest version.
Here’s how:
Step 1: Use Windows + R keys and type in “devmgmt.msc” in the Run utility box ad press Enter to open Device Manager

Step 2: In the list of devices in the Device Manager, double-click “Disk Drives” to expand it, right-click on your drive, click “Update Drivers”

Step 3: Select “Search Automatically for Drivers” and follow the subsequent prompts to install the new network adapter driver completely. Close the Device Manager window and restart your PC.
Method 5: Perform Clean Boot
Several users resolve the error performing clean boot; you can also try this method. To do so follow the below mention guidelines:
Step 1: Use Windows + R keys to open Run utility box > In the prompted box, type in “msconfig” and click OK to open the System Configuration window

Step 2: Click the Services tab section and check the Hide all Microsoft services box

Step 3: Tap on the Disable all button and then choose the Apply button > after that go to Startup tab and select the Open task manager link
Step 4: Choose Startup programs one by one and then select the Disable button

Step 5: Restart your PC and see if the issue resolved or not
Method 6: Ensure all the hardware Connections are installed properly
You are most likely to face the error due to a loose wire, incorrectly configured RAM modules or a defective connector. So we suggest you to open and then inspect each connection.
Specifically, look at the cables that connect your disk. This is an excellent place to start because issues with the hard disk drive may lead to this error. Afterwards, unhook the connectors and reinstall them in their proper locations.
Check the RAM modules as well. Are they seated correctly in their slots? Please remove them and firmly reconnect them. Once you are done then restart your PC.
Method 7: Use CHKDSK Scan
In this method we suggest you to use an inbuilt utility tool to test your Hard Disk Drive, to do so follow the below mention guidelines:
Step 1: Use Windows + R keys to open Run utility box> then search for cmd to open the Command Prompt and press OK
Step 2: In the next step enter the following commands and press Enter:
chkdsk c: /f /r
Note: Keep in mind that you must replace “c” with the exact drive letter of the operating system drive.
Method 8: Run Virus Scan
Oftentimes users face the above mention error due to malware attack. In such we suggest you to scan your PC for malware. You can use Windows Defender tool or a third party software to discover the presence of malware/virus on your PC.
Method 9: Change your Paging File
Sometimes the error message may appear due to paging file, in such case change your paging file. To do so follow the below mention steps:
Step 1: Use Windows + S keys and enter Advanced > Then select View advanced system settings from the menu
Step 2: When the System Properties window opens, click on Settings button in the Performance section

Step 3: Now go to the Advanced tab and click on the Change button > Check Automatically manage paging file size for all drives and click OK
Go for an Automatic Solution
These were some of the effective measures to get past Kernel Data Inpage Error, but if you are someone who don’t want to struggle with the manual methods, we suggest you an automatic PC Repair Tool. This professional tool is capable for fixing critical Windows errors such as BSOD Error, Registry Issues, DLL errors. Besides, it will enhance our system performance, so try this tool once if you are looking for a hassle free solution for the error.
⇑Get PC Repair Tool from Here⇓
Final Thoughts
That’s all folks! Regardless of its robustness, Windows Operating System is prone to errors, BSOD errors are one of the most common Windows errors. This error simply indicates that your system is in a pathetic situation and you need to pay heed on it. In this blog, we have tried to mention all the possible fixes to get past the error. Hope you liked the article.